Monday, April 21, 2014
'Best in Show' Footprint International Winner
How very exciting! I just learned that I'm the winner of the 'Best in Show' award at the Footprint International Competition at the Center for Contemporary Printmaking in Norwalk, Connecticut. Two of my prints - Return and Waving Goodbye - were selected by Juror Elisabeth Hodermansky, Sutphin Family Senior Associate Curator of Prints, Drawings, Photographs at the Yale University Art Gallery. To see all the winners, please go the website of the CCP.

Friday, April 4, 2014
Return

Return.
Triple-Plate Copper Etching, Chine-Collé.
30cm x 30cm. 2014.
I've had this image in my head ever since my trip home to Paraguay last year. Yes, I still call Paraguay home (one of them at least). This was the first time I was staying in the house of my childhood again and I was surprised how much at home I still felt with my surroundings. One of my most cherished memories are the neon-green, cheerful and loving parakeets nibbling at the beautiful, hand-sized blossoms of the bottle tree at my aunt's place, my favourite holiday destination. Bottle trees absorb water into their soft wood (very important in an arid region) and store the moisture in their ever expanding trunks, which they then protect from animals with giant spikes, forming a protected sanctuary. We used to have a bottle tree in our yard under which we often played growing up. I'm not entirely sure what the image means, but in many ways the trip was about returning home and returning to the roots of my childhood (even if I had to leave again). This piece is an addition to my autobiographical series exploring imagery about home and belonging.
This was my first triple plate print (light red, green, and black). I had a lot of fun playing with the soap ground again creating a more lively, less flat background with a more washy look.
Saturday, March 1, 2014
First Fridays Winnipeg
Miriam Rudolph.
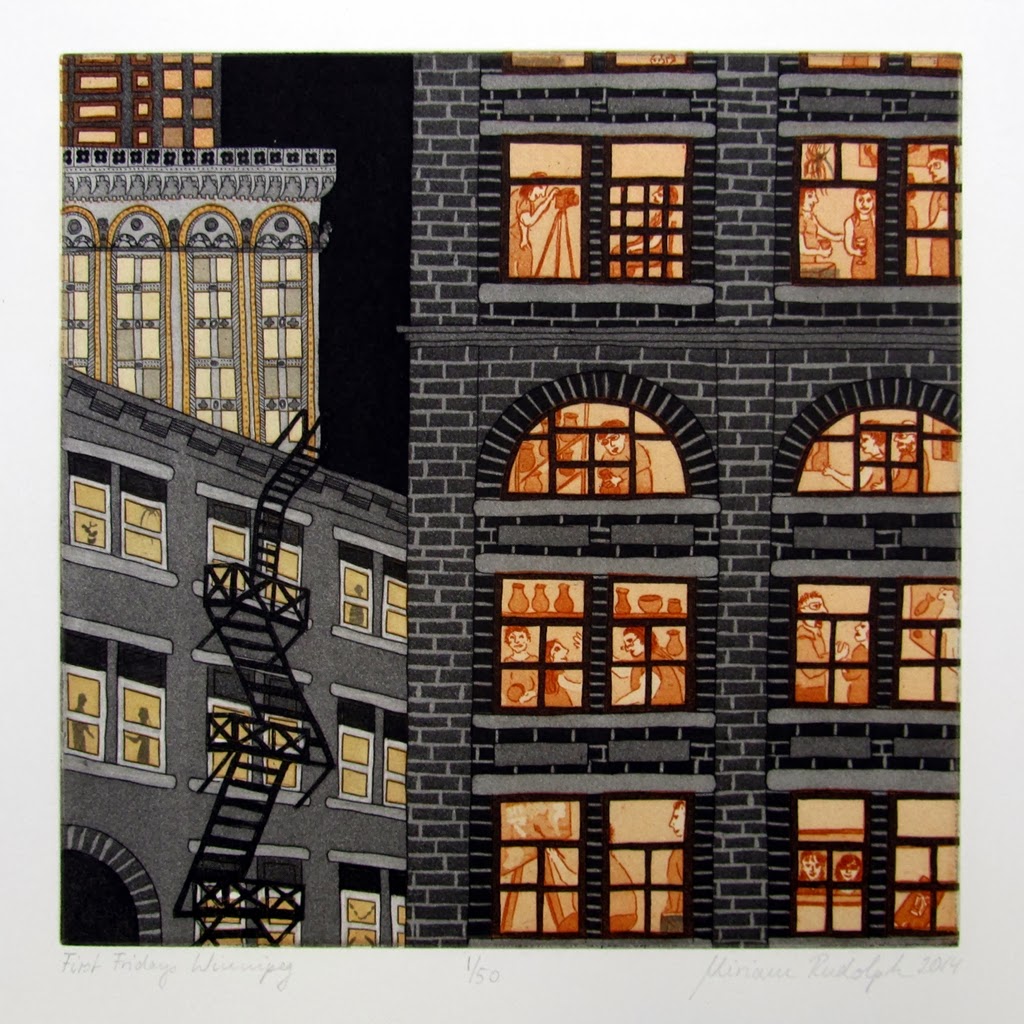
First Fridays Winnipeg.
Double-Plate Colour Etching.
22 x 22 cm. 2014.
First Fridays Winnipeg commissioned me to do a small etching a while back as a fundraiser piece. When I still had my studio in Winnipeg's exchange district, I always participated in the First Fridays event, where all studio artists and galleries open their doors to the public on the first Friday of each month. For me this was a wonderful way to show my work and talk about my work in a casual manner to people interested in art. It's a great and fun event! Well, I chose a Friday night in Winnipeg as my motif for this piece. In fact, the building in the foreground on the right is the Silpit Building where I used to have my studio, with all the illuminated windows and artists either working or showing their work. Take a peek for yourself through the windows. Front left, set back a little, is the Merchants Building and behind it you can see the upper part of the gorgeous Electric Railway Chambers on Notre Dame.
For this image I heavily borrowed composition and colours from an early piece of British printmaker Brenda Hartill, but I think I succeeded in making it my own by changing the format, using specific Winnipeg buildings and my own little vignettes behind the windows. I came across Brenda's work several years ago and was quite surprised how many similarities I found in our work (her London etchings at least). I greatly admire her prints!
My little print will be available soon through First Fridays in Winnipeg.
Thursday, December 19, 2013
My Minneapolis
Well, here it is! I finally managed to get a print I am satisfied with a few days ago. I knew it would be a lot of work to print those two big plates, but I didn't expect it to be THAT much work.
My Minneapolis.
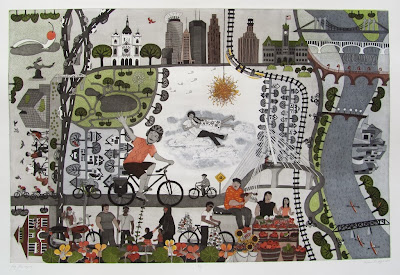
Double-Plate Colour Etching, Relief Roll through Stencils.
60cm x 90cm. 2013.
My Minneapolis is about my life for the past two years in this city. It is an (extended) view through my window past the Nasturtium in my flower box with the Minneapolis skyline on the horizon (see tiny figure at the window in the bottom left corner). The piece includes parts of the city that I know and like: the Walker Art Museum with sculpture garden, Loring Park, St. Mary's Basilica, the Stone Arch Bridge and St. Anthony Falls, the Weisman Museum, the Sabo Bridge, the Midtown Farmers Market, French Meadows Café with the greedy sparrows ready to pick up crums (from your plate if need be) and of course, the Greenway. This is also the city where I fell in love with my husband ten years ago on a school of art field trip. I think I mentioned this before, but one of the memories I had from that trip was the Chihuly sunburst chandelier, hence the center part. That's it for now. I'm taking a little holiday break now and in January I hope to start printing the edition. Cheers!

Double-Plate Colour Etching, Relief Roll through Stencils.
60cm x 90cm. 2013.
My Minneapolis is about my life for the past two years in this city. It is an (extended) view through my window past the Nasturtium in my flower box with the Minneapolis skyline on the horizon (see tiny figure at the window in the bottom left corner). The piece includes parts of the city that I know and like: the Walker Art Museum with sculpture garden, Loring Park, St. Mary's Basilica, the Stone Arch Bridge and St. Anthony Falls, the Weisman Museum, the Sabo Bridge, the Midtown Farmers Market, French Meadows Café with the greedy sparrows ready to pick up crums (from your plate if need be) and of course, the Greenway. This is also the city where I fell in love with my husband ten years ago on a school of art field trip. I think I mentioned this before, but one of the memories I had from that trip was the Chihuly sunburst chandelier, hence the center part. That's it for now. I'm taking a little holiday break now and in January I hope to start printing the edition. Cheers!
Monday, December 16, 2013
Editing the Plates - Progress Report Six of My Minneapolis
I spent the past week editing and proofing and editing and proofing my plates some more. Here are some of the changes and improvements I made. I didn't like how the yellow stencil looked on the chandelier (left), so I etched some shadows into the sunburst (middle) and together they work quite well (right). The sunburst looks a lot more dimensional now.

For the Walker Art Museum I tried to re-create the uneven surfaces of the metal tiles that cover the building. I used a small burnisher to burnish a pattern into to the aquatints.

The Weisman Museum also received some burnished highlights which give it more life.

I also cut the stencils (top below) for the yellow and some red and green in areas where those colours would otherwise overlap, which makes it impossible to wipe à la poupée on the same plate. Through the stencil I simply roll the ink onto the surface of the wiped plate (bottom below). Well, three months later I finally have one good print, which I will try to post tomorrow, so you can finally see what the finished piece looks like. The editioning of the piece I will leave till the new year.


For the Walker Art Museum I tried to re-create the uneven surfaces of the metal tiles that cover the building. I used a small burnisher to burnish a pattern into to the aquatints.

The Weisman Museum also received some burnished highlights which give it more life.

I also cut the stencils (top below) for the yellow and some red and green in areas where those colours would otherwise overlap, which makes it impossible to wipe à la poupée on the same plate. Through the stencil I simply roll the ink onto the surface of the wiped plate (bottom below). Well, three months later I finally have one good print, which I will try to post tomorrow, so you can finally see what the finished piece looks like. The editioning of the piece I will leave till the new year.


Sunday, December 8, 2013
Soap Ground Detail - Progress Report Five of My Minneapolis
This past week was quite busy with preparations for the Winter Cooperative Exhibition Prints on Ice at Highpoint. But I've inched my way a bit closer to finishing the My Minneapolis print. I worked some more on correcting and adjusting some small things and I think I worked out a solution for the white space in the center of the piece. A few months ago I took a weekend workshop in soap ground etching, which I've been wanting to try out in my work. The soap ground is a mixture of finely grated ivory soap dissolved in water and linseed oil to create a paste. This paste is painted in various dilutions and thicknesses onto the copper and works as a permeable resist to the acid. (The soap ground is the white stuff on the plate; the black figures are stopped out with asphaltum so the acid can't get to them).

Where the ground is really thin, the acid will get through to the copper quicker than in areas where the gound is painted on thickly. The result is a wonderful painterly effect. This is my first proof of the result of the soap ground.

I softened the edges around the soap ground a bit, but I still have to see if this part of the image fits with the rest of the print. I wanted to give the figure some sky or cloud backdrop so they're not simply floating in empty space under the Dale Chihuly chandelier sun (Sunburst). The figures that are white in this proof will later be printed with the key plate. Anyways, a few more days of editing and proofing. I hope by the end of this week I can make the first few prints of the edition. Keep your fingers crossed.
Tuesday, November 26, 2013
Registration of Multiple Plates
I learned this wonderful registration technique for printing multiple plates at Highpoint and I will be forever grateful. It increased the rate of successfully registered prints considerably. I'm not sure which clever mind invented this registration jig, but I believe my sources got it from Crown Point Press, so I'll refer you to their blog on how to make a registration jig. (I wasn't successful cutting my jig on the jump cutter, so I got someone to cut it for me with a diamond blade. It was quite jagged afterwards, but easy to smooth with a file). The jig consists of two L-shaped copper pieces. The narrower one, or registration bar, is taped onto the press bed with double-sided tape.
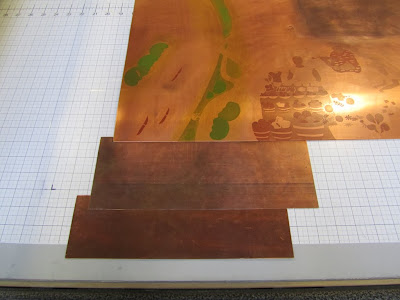
The second one, which should be at least as wide as your paper border, is a removable jig.

Every time I put my plate on the press bed, I place it into the jig, which ensures all plates are always in exactly the same spot. I keep the paper trapped under the roller when I change the plates, i.e. the paper never moves and the plates are always in place. This system is pretty much fool proof!

The second one, which should be at least as wide as your paper border, is a removable jig.

Every time I put my plate on the press bed, I place it into the jig, which ensures all plates are always in exactly the same spot. I keep the paper trapped under the roller when I change the plates, i.e. the paper never moves and the plates are always in place. This system is pretty much fool proof!
Subscribe to:
Posts (Atom)


 Posts
Posts

